There’s one more week in January. How are your resolutions going?
I stopped making resolutions a few years ago because they are a trap. You aim high, you aspire to be better, then when life happens and you stumble, you’re a failure and might as well give up.
Well, that’s how it went for me.
After years of rolling my eyes at resolutions (you can’t fail if you never try!), I heard about choosing a single word for the year. A theme or focus, not a goal. Worth a shot, right?
I LOVE it. This is my 4th year doing so. Here’s what I came up with. [click to continue…]
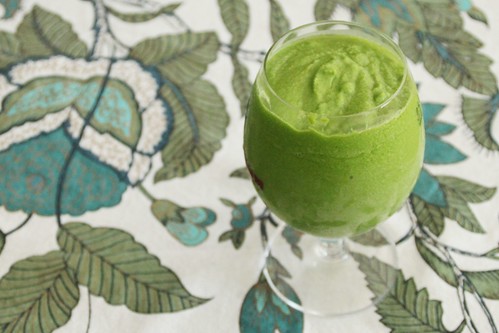
Babies take up a lot of time. Like a lot a lot. He doesn’t leave me much time to prepare food at all, let alone take pictures of it.
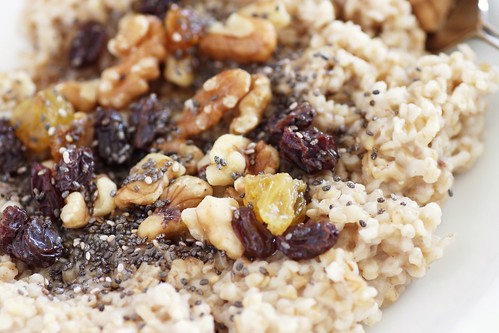
Breakfast is usually our most work-intensive meal since he’s now content to play in the living room while I prep. We have egg-and-mushroom scrambles and oatmeal a lot, but the kiddo also LOVES green smoothies. He bounces up and down in his high chair and squeals with anticipation.
Someday I’ll remind him of this, I’m sure.
My favorite green smoothie is delicious, but it has more ingredients. More ingredients that I need to have all at the same time AND cut up? This one will work just fine, thanks.
It’s gluten-free, dairy-free, vegan, and probably paleo! It’s even extra hydrating to help replace all the fluid and electrolytes I’m losing to nursing at all hours of the night.
This time of year I might toss in some lemon or lime and omit the cucumber. You could throw in a little
banana, either frozen or fresh, if you wanted to add some heft. Just do it quickly before your 1-year-old wants to steal it from you.
print recipe
Super Hydrating Green Smoothie
by Stacy Spensley March-4-2014
Quick and refreshing, like getting slapped in the face with a sunbeam. If using fresh mango, you may want to add more ice. I only add cucumber in the summer.
Ingredients
1 cup coconut water
2-3 cups spinach or other greens, packed
2 tablespoons unsweetened shredded coconut
1/2 cup mango, cubed (fresh or frozen)
1/2 cup cucumber (optional)
4 ice cubes
Instructions
1.) Combine all ingredients and blend until smooth. If you don’t have a great blender, puree the greens and coconut in the coconut water before adding the frozen stuff.
Details
Prep time: Cook time: Total time: Yield: 2 servings
When I found out I was pregnant, I promised myself that I wasn’t going to be That Mom who overshares about bodily fluids on social media. Now that I have a 6-month-old (whaaaat?) I realize that dealing with bodily fluids occupies much of my day. I’m doing pretty well on social media.
But I never said I wouldn’t blog about bodily fluids! Indirectly, since this is really about digestion before anything exits your system. Ahem.
Is it glamorous? No. But what goes in must come out, and I’ve had several clients with questions about this topic. So here goes!
Fiber is good stuff. It’s not nutritious (in fact, babies starting solids shouldn’t have too much because it can clog their developing digestive tracts), but adults need fiber to help our systems work. When people switch from refined (white) to whole grains and increase their produce intake, they’ll often notice the impact of all that fiber.
Some people, however, can have uncomfortable side effects from a high fiber diet. The main reason is that they’ve increased one type of fiber more than the other.
From my health coaching practice and this blog people seem to think that I subsist on kale, chia seeds, and essence of unicorn mixed into my green juice. And that’s absolutely true. …Oh wait, no. As of this writing, the staple of my diet for the last few months has been trail mix. It’s getting […]
You know what’s awesome? Burgers. Hamburgers, turkey burgers, salmon burgers, black bean burgers – put a slab of protein on a bun, preferably cooked on a grill outside, and call it summer. Add the first tomatoes, cucumbers, and melons of the season, and you have the perfect recipe for the Fourth of July. As much […]
Somehow I blinked and missed May. Time does fly, and I love snuggling this guy, but it’s been a challenge to balance being present and actually getting anything done ever. Whew. We spent the first week of June back in Minnesota for a friend’s wedding and a visit. Both my mom and my in-laws live […]
Photo credit: David Goehring Happy Earth Day! With all the green-washing going on these days, you’d think that you have to spend a lot of green to be green. That’s simply not the case. There is a reason that the phrase is “Reduce, Reuse, Recycle” in that order. Instead of buying a hybrid car when […]
Most people, myself included, start out skeptical of green juice. I’ve written previously about my resistance to trying green smoothies, but once I drank the metaphorical Kool-Aid, I was hooked. Green juice was a harder sell. I don’t even drink fruit juice anymore (Think about how many oranges go into an 8-ounce glass of juice; […]
The February selection for The Kitchen Reader book club was The Sharper Your Knife, the Less You Cry: Love, Laughter, and Tears in Paris at the World’s Most Famous Cooking School by Kathleen Flinn, chosen by me! Yes, this review is a month late. I blame the extremely time-consuming task of snuggling this baby. The […]
You probably guessed where I’ve been, and you’re right. Or if you follow me on Facebook, Twitter, or Instagram, you’ve seen more photos. Iver James was born February 15th just before 6:00am.